
1. How to Mail Merge the Last Name Field
Step 1. Open the Document and Select ‘Mailings’
Open the file you wish to utilise for the mail merge in MS Word. Select the ‘Mailings’ tab in the menu bar.
Step 2. Select ‘Start Mail Merge’
Select ‘Start Mail Merge’ from the toolbar, then choose the sort of document you want to create (such as letters, envelopes, or labels).
Step 3. Add Data Source
From the toolbar choose ‘Select Recipients’ and then select ‘Use an Existing List’ to add your data source (such as an Excel file containing organised data, including the last name field).
Step 4. Select Excel Sheet
A dialogue box will appear containing the list of Excel sheets in an Excel file named ‘Select Table’, select the sheet containing data. Move the pointer to the desired location in the file where the ‘Last Name’ should appear.
Step 5. Click Insert Merge Field
Click ‘Insert Merge Field’ and choose the last name from the dropdown option. A substitute instead of ‘Last Name’, such as «Last Name» should now be visible to you. Select ‘Preview Results’ to see if records are correctly added.
2. How to Mail Merge in Word and Skip Field if Blank
Step 1. Open Document and Click Mailings
Open the Word document for mail merging, and go to the tab ‘Mailings’.
Step 2. Add Data Source
Click ‘Start Mail Merge’ to choose the type of document (e.g., E-mail messages) then, choose ‘Select Recipients’ and add the data source through ‘Use an Existing List’.
Step 3. Select Rules
Point the cursor where a merging field needs to be inserted. In the menu bar select ‘Mailings’, then go to ‘Rules’ and choose ‘Skip Record If’.
Step 4. Customise Skip Record If Settings
Select the field that might be blank (such as Last Name) from the ‘Field Name’ dropdown that appears in the Skip Record If dialogue box. Keep the Compared to box unfilled and set the comparison to ‘is blank’ mode. Press ‘OK’. When the mail is merged the record with a blank ‘Last Name’ will be ignored.
Step 5. Check Out Your Results
To check out the layout of your document with the merge field filed in, select ‘Preview Results’ on the ‘Mailings’ tab.
3. How to Remove a Line if a Merge Field is Blank in Word Mail Merge
Step 1. Open Document and Click Mailings
Open the Word document for mail merging, and go to the tab ‘Mailings’.
Step 2. Add Data Source
Click ‘Start Mail Merge’ to choose the type of document (e.g., E-mail messages) then, choose ‘Select Recipients’ and add the data source through ‘Use an Existing List’.
Step 3. Get Rid of Blank Lines through Field Codes
Point the cursor to the location of the merge field («Last Name»). To add a pair of brackets like this { }, use Ctrl +F9. Enter the field code that follows in these brackets:
{ IF { MERGEFIELD "LastName" } = "" "" "{ MERGEFIELD "LastName" }" }
This code indicates that if the Last Name field is blank, enter nothing; or can only enter the LastName field.
Step 4. Review the Field
Highlight the field code and to update it click F9.
Step 5. Verify Appropriate Line Spacing
If the merge field is empty, occasionally utilising the IF field alone can still result in an empty line.
Highlight the paragraph and press Ctrl +F9 to add brackets. Change the field code so that the IF statement contains the following:
{ IF { MERGEFIELD "LastName" } = "" "" " Last Name: { MERGEFIELD "LastName" }¶" }
Press ‘Enter’ inside the code, to substitute this ¶ symbol with a real paragraph mark.
Step 6. Check Out Your Results
To check out the layout of your document with the merge field filed in, select ‘Preview Results’ on the ‘Mailings’ tab.
Step 7. Finish the Mail Merge
If everything appears in order, select ‘Finish & Merge’ and click the relevant option (such as Edit Individual Documents, Print Documents, or Send Email Messages).
4. How to Use IF… THEN…ELSE in Word Mail Merge
Step 1. Open Document and Click Mailings
Open the Word document for mail merging, and go to the tab ‘Mailings’.
Step 2. Add Data Source
Click ‘Start Mail Merge’ to choose the type of document (e.g., E-mail messages) then, choose ‘Select Recipients’ and add the data source through ‘Use an Existing List’ (e.g., an Excel file).
Step 3. Add an If… Then…Else Rule
Point the cursor where you intend to insert the conditional text or merge field. Then, select the ‘Rules’ option in the ‘Mailings’ tab, and choose If…Then…Else.
Step 4. Set up the If… Then…Else Rule
Within the ‘Insert Word Field: If’ dialogue box specifies your criteria:
- Field Name: Select the field to check (e.g., Place: Pune).
- Comparison: Decide on any comparison option (is equal to, is blank, etc).
- Compare to: Insert the value to be checked against (leave blank if comparing against an empty field).
- Notify what to do if the condition is met:
Insert this text: If the criteria are true, enter the text or choose a merge field (such as ‘Torrential rain. Be aware’) to insert.
- Notify what to do if the condition is not met:
Otherwise, insert this text: If the criteria are false, enter the text or choose a merge field (such as ‘Sunny weather. Enjoy’) to insert.
Step 5. Check Out Your Results
To check out the layout of your document with the merge field filed in, select ‘Preview Results’ on the ‘Mailings’ tab.
Step 6. Finish the Mail Merge
If everything appears in order, select ‘Finish & Merge’ and click the relevant option (such as Edit Individual Documents, Print Documents, or Send Email Messages).
5. How to display Merge Fields in Word 2016
Step 1. Open Document and Click Mailings
Open the Word document 2016 for mail merging, and go to the tab ‘Mailings’.
Step 2. Add Data Source
Click ‘Start Mail Merge’ to choose the type of document (e.g., E-mail messages) then, choose ‘Select Recipients’ and add the data source through ‘Use an Existing List’ (e.g., an Excel file).
Step 3. Insert Merge Fields
Point the cursor where in your file you wish to add a merge field. Select ‘Insert Merge Fields’ from the ‘Mailings’ menu and add desired fields.
Step 4. See the Merge Fields
Select ‘Highlight Merge Fields’ under ‘Mailings’ tab to view the merge fields in your file. This will make every merge field in your file stand out.
Step 5. Check Out Your Results
To check out the layout of your document with the merge field filed in, select ‘Preview Results’ on the ‘Mailings’ tab.
Step 6. Finish the Mail Merge
If everything appears in order, select ‘Finish & Merge’ and click the relevant option (such as Edit Individual Documents, Print Documents, or Send Email Messages).
6. How to setup Mail Merge in Word if the Field is Empty
Step 1. Open Document and Click Mailings
Open the Word document 2016 for mail merging, and go to the tab ‘Mailings’.
Step 2. Add Data Source
Click ‘Start Mail Merge’ to choose the type of document (e.g., E-mail messages) then, choose ‘Select Recipients’ and add the data source through ‘Use an Existing List’ (e.g., an Excel file).
Step 3. Insert an If Field
Point the cursor where you intend to insert the conditional text or merge field. Then, select the ‘Rules’ option in the ‘Mailings’ tab, and choose If…Then…Else.
Step 4. Set up the If… Then…Else Rule
Within the ‘Insert Word Field: If’ dialogue box specifies your criteria:
- Field Name: Select the field to check (e.g., title field).
- Comparison: Decide on any comparison option (is equal to).
- Compare to: Insert the value to be checked against (leave blank if comparing against an empty field).
- Notify what to do if the condition is met:
Insert this text: If the criteria are true, enter the text or choose a merge field (such as ‘Sir/Madam’) to insert.
- Notify what to do if the condition is not met:
Otherwise, insert this text: If the text or merge field context is changing in nature then add a set of curly braces {}, using Ctrl +F9. Within the brackets type – {MERGEFIELD Title} {MERGEFIELD Last_ Name} to add title and last name if the field is not empty. Click OK!
Step 5. Check Out Your Results
To check out the layout of your document with the merge field filed in, select ‘Preview Results’ on the ‘Mailings’ tab.
Step 6. Finish the Mail Merge
If everything appears in order, select ‘Finish & Merge’ and click the relevant option (such as Edit Individual Documents, Print Documents, or Send Email Messages).
a) How to Insert Merge Field Word 2010
Step 1. Open Document and Click Mailings
Open the Word document 2016 for mail merging, and go to the tab ‘Mailings’.
Step 2. Add Data Source
Click ‘Start Mail Merge’ to choose the type of document (e.g., E-mail messages) then, choose ‘Select Recipients’ and add the data source through ‘Use an Existing List’ (e.g., an Excel file, Outlook contracts).
Step 3. Insert Merge Fields
Point the cursor where in your file you wish to add a merge field. Select ‘Insert Merge Fields’ from the ‘Mailings’ menu and add desired fields.
Step 4. Repeat the Step if Required
To add more merge fields to the files, repeat the steps.
Step 5. Check Out Your Results
To check out the layout of your document with the merge field filed in, select ‘Preview Results’ on the ‘Mailings’ tab.
Step 6. Finish the Mail Merge
If everything appears in order, select ‘Finish & Merge’ and click the relevant option (such as Edit Individual Documents, Print Documents, or Send Email Messages).
b) How to Word Doc Merge Second Placement of a Field in the Same Document
Step 1. Insert First Fields
Move the pointer to the desired location of the first field. From the Ribbon choose ‘Insert’ tab, then select ‘Quick Parts’, followed by ‘Field’. Select the required field (such as ‘Author’, ‘Title’, etc) from the list. Press OK.
Step 2. Insert Second Fields
Move the cursor to the desired location for the second instances of the identical field. To insert the same field again, follow the previous instructions.
Step 3. Making Use of Cross- References and Bookmarks
- Move the pointer to the desired location of the first field. Put the text or other contents you wish to use here.
- After choosing the text or content, select the ‘Insert’ tab, click ‘Bookmark’, and then assign it a name (such as ‘FirstField’). Press ‘Add’.
- Move the pointer to the desired location for the second instance of the field. Navigate to the ‘Insert’ tab on the Ribbon and select ‘Cross-reference’.
- Click the ‘Reference type’ drop-down menu and choose ‘Bookmark’. Click the ‘Insert reference to’ drop-down menu and choose ‘Bookmark text’.
- Choose the bookmark that you made (such as ‘FirstField’). Press ‘Insert’.
Step 4. Use Content Control
When working with more intricate files use this option. Move the pointer to the desired location of the first field. Navigate to ‘Developer’ tab, insert a text control, such as a ‘Rich Text Content Control’.
Step 5. Copy and Paste the Content Control
Move the pointer to the desired location for the second instance of the field. Paste the first content control, copying it, into the second place. Any modifications to the original will be reflected in the pasted content control.
Step 6. Field Updating
It is required to update fields, bookmarks, or content controls, after inserting them. To update entire documents, use Ctrl +A and then press F9.
c) Word Mail Merge Skip Record If Field Blank
Step 1. Open Document and Click Mailings
Open the Word document for mail merging, and go to the tab ‘Mailings’.
Step 2. Add Data Source
Click ‘Start Mail Merge’ to choose the type of document (e.g., E-mail messages) then, choose ‘Select Recipients’ and add the data source through ‘Use an Existing List’.
Step 3. Select Rules
Point the cursor where a merging field needs to be inserted. In the menu bar select ‘Mailings’, then go to ‘Rules’ and choose ‘Skip Record If’.
Step 4. Customise Skip Record If Settings
Select the field that might be blank (such as Last Name) from the ‘Field Name’ dropdown that appears in the Skip Record If dialogue box. Keep the Compared to box unfilled and set the comparison to ‘is blank’ mode. Press ‘OK’. When the mail is merged the record with a blank ‘Last Name’ will be ignored.
Step 5. Check Out Your Results
To check out the layout of your document with the merge field filed in, select ‘Preview Results’ on the ‘Mailings’ tab.
Step 6. Finish the Mail Merge
If everything appears in order, select ‘Finish & Merge’ and click the relevant option (such as Edit Individual Documents, Print Documents, or Send Email Messages).
d) How to Formatting Merge Fields in Word
Step 1. Open Document and Click Mailings
Open the Word document for mail merging, and go to the tab ‘Mailings’.
Step 2. Add Data Source
Click ‘Start Mail Merge’ to choose the type of document (e.g., E-mail messages) then, choose ‘Select Recipients’ and add the data source through ‘Use an Existing List’.
Step 3. Add ‘Insert Merge Field’
From the ‘Mailings’ Ribbon, select ‘Insert Merge Field’ and add your desired field.
Step 4. Apply Basic Formatting
From the ribbon use ‘Home’ tab tools, add your preferred formatting (e.g., modify the size, colour, bold, Italic, font, etc).
Step 5. Formatting Numeric and Date
In the merge field, right click and choose ‘Toggle Field Codes’. It will display the field code rather than the field name. In the field code, add a switch to format dates or numbers.
- Date: { MERGEFIELD_Date\@ “dd/MM/yy”}
- Time: {MERGEFIELD_Start_Time\@ “hh:mm AM/PM”}
- Numbers: {MERGEFIELD Number\# “#,##0.00”}
- Amount: {MERGEFIELD Amount\#$,#.00}
Right-click the field code and click ‘Update Field’.
Step 6. Check Out Your Results
To check out the layout of your document with the merge field filed in, select ‘Preview Results’ on the ‘Mailings’ tab.
Step 7. Finish the Mail Merge
If everything appears in order, select ‘Finish & Merge’ and click the relevant option (such as Edit Individual Documents, Print Documents, or Send Email Messages).
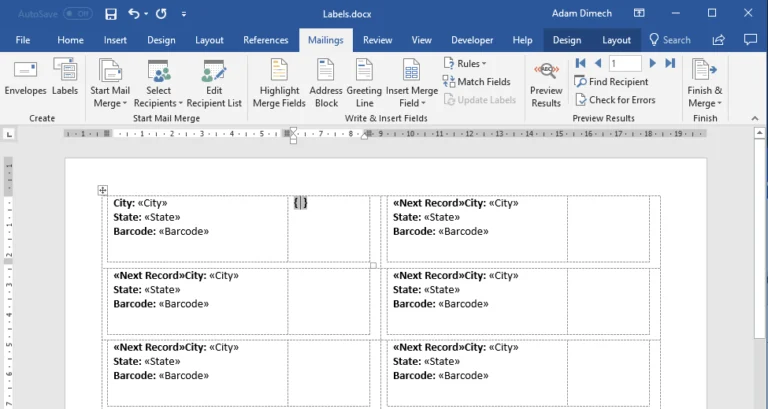
e) How To Word Mail Merge Repeating Fields by Using Record If rule
Step 1. Open Document and Click Mailings
Open the Word document for mail merging, and go to the tab ‘Mailings’.
Step 2. Add Data Source
Click ‘Start Mail Merge’ to choose the type of document (e.g., E-mail messages) then, choose ‘Select Recipients’ and add the data source through ‘Use an Existing List’.
Step 3. Create a Table
Create a table in the file wherein you prefer the repeating fields to appear. For instances, set up first labels as First Name or Address, etc as required, the table’s cells will each correspond to a label.
Step 4. Insert Merge Fields
Move the pointer to the table’s cell. After selecting the relevant field, click ‘Insert Merge Field’. For every field repeat this process.
Step 5. Include the Rule Next Record If
Put the pointer to the start of the second cell. Access the ‘Mailings’ tab, select ‘Rules’, then choose ‘Next Record If’. Set the condition to move to the next record.
Step 6. Finish the Mail Merge
If everything appears in order, select ‘Finish & Merge’ and click the relevant option (such as Edit Individual Documents, Print Documents, or Send Email Messages).
f) How to Toggle Merge Fields In Word
Step 1. Insert the Merge Field
On the Ribbon select ‘Mailings’ tab, select ‘Insert Merge Field’ and choose the desired field.
Step 2. Toggle the Field Code
Select the merge field, right click on it. Click on ‘Toggle Field Codes’ or press Ctrl +A to select all the content and press Shift + F9 to toggle the field codes for every field. The field code will go from «FirstName» to {MERGEFIELD FirstName}.
Step 3. Toggle Back to Field Results
Press Ctrl +A to select all the content and press Shift + F9 to toggle back to field result or right click on field codes and click ‘Toggle Field Codes’.
A Shortcut:
You can use Alt + F9 to toggle all the field code.
g) How to Add Last Name Field Mail Merge Word
Step 1. Open the Document and Select ‘Mailings’
Open the file you wish to utilise for the mail merge in MS Word. Select the ‘Mailings’ tab in the menu bar.
Step 2. Select ‘Start Mail Merge’
Select ‘Start Mail Merge’ from the toolbar, then choose the sort of document you want to create (such as letters, envelopes, or labels).
Step 3. Add Data Source
From the toolbar choose ‘Select Recipients’ and then select ‘Use an Existing List’ to add your data source (such as an Excel file containing organised data, including the last name field).
Step 4. Select Excel Sheet
A dialogue box will appear containing the list of Excel sheets in an Excel file named ‘Select Table’, select the sheet containing data. Move the pointer to the desired location in the file where the ‘Last Name’ should appear.
Step 5. Click Insert Merge Field
Click ‘Insert Merge Field’ and choose the last name from the dropdown option. A substitute instead of ‘Last Name’, such as «Last Name» should now be visible to you. Select ‘Preview Results’ to see if records are correctly added.
Step 6. Finish the Mail Merge
If everything appears in order, select ‘Finish & Merge’ and click the relevant option (such as Edit Individual Documents, Print Documents, or Send Email Messages).
h) How to Word Merge Field Date Format
Step 1. Put the Date Merge Field
Move the pointer to the desired location for date. Go to the ‘Mailings’ tab and select ‘Insert Merge Field’. From the data source choose the date field.
Step 2. Toggle Field Code
Right-click on the date field. Click on ‘Toggle Field Codes’ The result will show from «Date» to {MERGEFIELD_Date}.
Step 3. Add the Date Switch
Add the date format switch to the field code. { MERGEFIELD_Date\@ “dd/MM/yy”} it is standard syntax.
Step 4. Update and Toggle Back
To update the field code, right-click on it and choose ‘Update Field’. To return to the field result, right-click again and select ‘Toggle Field Codes’.
i) How to Microsoft Word merge field calculation
Step 1. Open Document and Click Mailings
Open the Word document for mail merging, and go to the tab ‘Mailings’.
Step 2. Add Data Source
Click ‘Start Mail Merge’ to choose the type of document (e.g., E-mail messages) then, choose ‘Select Recipients’ and add the data source through ‘Use an Existing List’.
Step 3. Add ‘Insert Merge Field’
From the ‘Mailings’ Ribbon, select ‘Insert Merge Field’ and add your desired field (e.g., Price or Quantity).
Step 4. Toggle Field Code
Right-click on the field and select “Toggle Field Codes’ to view.
Step 5. Add Calculation and Update
Change the field code to carry out the computations:
- Addition: ‘{= {MERGEFIELD Field1} + {MERGEFIELD2} }’
- Subtraction: ‘{= {MERGEFIELD Field1} – {MERGEFIELD2} }
Add all the formulas you need. Right-click the field code, and click ‘Update Field’. After that right-click again to ‘Toggle Field Codes’ to see the desired result.
j) How To Microsoft Word Merge Field Conditions
Step 1. Open Document and Click Mailings
Open the Word document for mail merging, and go to the tab ‘Mailings’.
Step 2. Add Data Source
Click ‘Start Mail Merge’ to choose the type of document (e.g., E-mail messages) then, choose ‘Select Recipients’ and add the data source through ‘Use an Existing List’.
Step 3. Insert Conditions
Go to ‘Mailings’> ‘Rules’ and then:
- Next Record: advance to the next entry in the data source.
- Next Record If: if the condition is satisfied, advance to the next record.
- Skip Record If: if a condition is met, skip the current record.
In the above three conditions follow the step of “IF…THEN…ELSE’.
- Fill-in: requests data entry from the user during the merge process. Enter the prompt text (like, profit percentage)
- Ask: Keep the input for later use in a bookmark. Enter the prompt text and bookmark name.
Step 4. Check Out Your Results
To check out the layout of your document with the merge field filed in, select ‘Preview Results’ on the ‘Mailings’ tab.
Step 5. Finish the Mail Merge
If everything appears in order, select ‘Finish & Merge’ and click the relevant option (such as Edit Individual Documents, Print Documents, or Send Email Messages).
k) How to Mail Merge Word Field Number Format
Step 1. Add ‘Insert Merge Field’
From the ‘Mailings’ Ribbon, select ‘Insert Merge Field’ and add your desired field (like currency).
Step 2. Toggle Field Codes
Right-click on the field and click ‘Toggle Field Codes’ to display the field code.
Step 3. Edit the Numbers
Add the standard format into the desired number field.
- Currency: ‘\# “$#, ##0.00″’
- Percentage: ‘\# “0.00%”’
Step 4. Update and Toggle Back
Right-click the field code, and click ‘Update Field’. After that right-click again to ‘Toggle Field Codes’ to see the desired result